Read this in other languages
🇺🇸 English | 🇨🇳 简体中文 | 🇯🇵 日本語 | 🇰🇷 한국어 | 🇩🇪 Deutsch | 🇫🇷 Français | 🇪🇸 Español | 🇮🇳 हिन्दी | 🇧🇷 Português | 🇷🇺 Русский | 🇸🇦 العربية | 🇮🇷 فارسی | 🇮🇹 Italiano | 🇵🇱 Polski | 🇳🇱 Nederlands | 🇹🇷 Türkçe | 🇺🇦 Українська | 🇻🇳 Tiếng Việt | 🇮🇩 Bahasa Indonesia | 🇸🇪 Svenska | 🇬🇷 Ελληνικά | 🇷🇴 Română | 🇨🇿 Čeština | 🇫🇮 Suomi | 🇩🇰 Dansk | 🇳🇴 Norsk | 🇭🇺 Magyar | 🇹🇭 ภาษาไทย | 🇺🇿 Oʻzbekcha | 🇹🇼 繁體中文 | 🇵🇭 Filipino | 🇮🇱 עברית










將代理的 token 開銷削減 80%。 Graphify Cloud 是一套始終在線的記憶層,為你的代理提供治理、維持高水準的程式碼品質,並透過形式化驗證來證明正確性。開始 14 天免費試用 →
在你的 AI 程式設計助理中輸入 /graphify,它會把你的整個專案(程式碼、文件、PDF、圖片、影片)映射成一張知識圖譜,讓你可以用查詢取代在檔案裡逐一 grep。
- 程式碼映射免費,完全在地運行。 程式碼透過 tree-sitter AST 解析:具確定性、無需 LLM,任何內容都不會離開你的機器。(文件、PDF、圖片和影片會使用你助理的模型或已設定的 API 金鑰進行一次語意解析。)
- 每一條邊都有解釋。 每個連接都會被標記為
EXTRACTED(原始碼中明確存在)或INFERRED(由 graphify 推斷得出),因此你能分清哪些是直接讀取的、哪些是推斷出來的。 - 這不是向量索引。 沒有嵌入、沒有向量庫:這是一張你可以真正走訪的圖。提出一個問題、追蹤兩個事物之間的路徑,或解釋某一個概念。
Note
想讓它始終在線? Graphify Cloud 會在你的整個 SDLC 中保持圖譜即時更新:支援 monorepo 與跨儲存庫、形式化驗證,以及帶有 SDLC 全局視角的程式碼審查,還有 Sentry、Jira 等連接器,讓事故與工單與你的程式碼處於同一張圖中。在 app.graphify.com 開始 14 天免費試用。
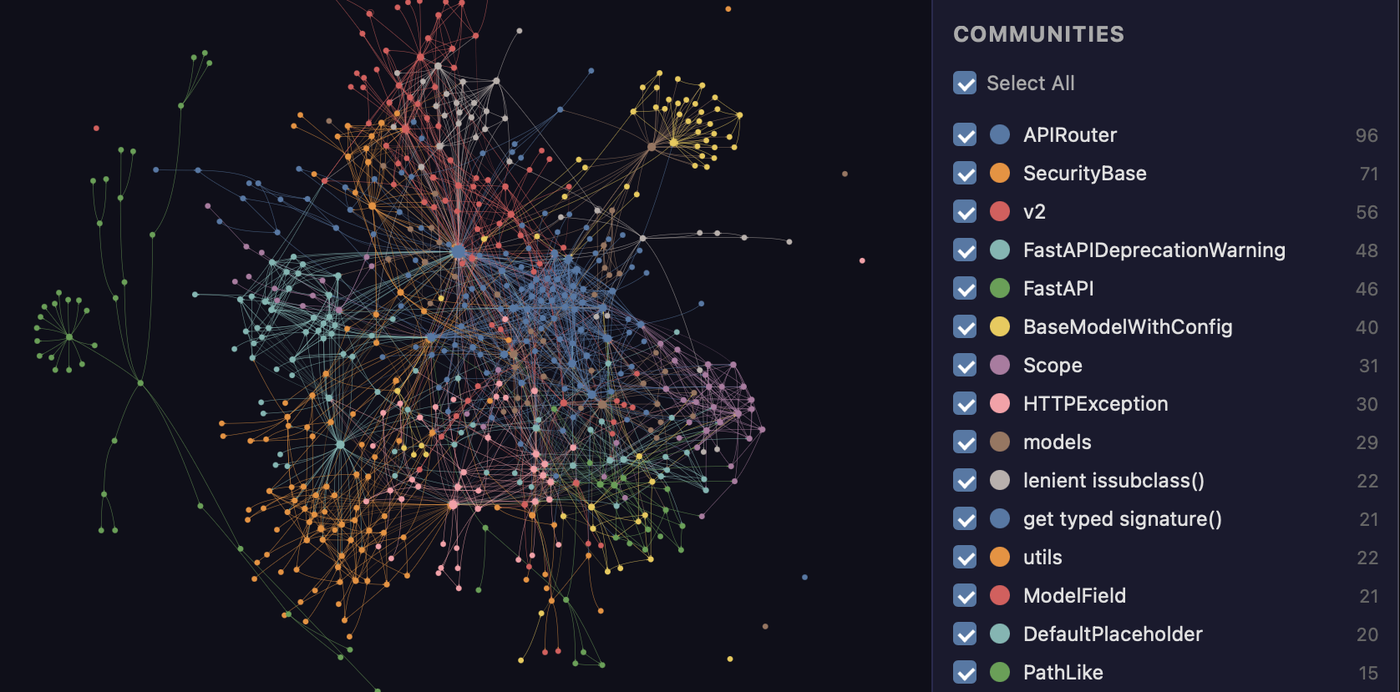
由 graphify 映射的 FastAPI 程式碼庫。每個節點都是一個概念,顏色代表偵測到的社群,整張圖在 graph.html 中都可點擊。
快速上手(30 秒):
uv tool install graphifyy      # install the CLI (or: pipx install graphifyy)
graphify install               # register the skill with your AI assistant
接著,在你的 AI 助理中:
/graphify .
就這樣。你會得到三個檔案:
graphify-out/
├── graph.html       open in any browser — click nodes, filter, search
├── GRAPH_REPORT.md  the highlights: key concepts, surprising connections, suggested questions
└── graph.json       the full graph — query it anytime without re-reading your files
持久化的圖譜包含 graph.schema_version,讓整合方能偵測
不相容的格式變更,另外還有 graph.graphify_version,用於標識產生該圖譜的
Graphify 版本。
支援 Claude Code、Cursor、Codex、Gemini CLI、GitHub Copilot 及 15 種以上平台 —— 選擇你的平台。
文件
完整的指南與參考資料位於 docs.graphify.com:
- Quickstart —— 建立你的第一張圖
- CLI reference —— 每一個命令和旗標
- Ask better graph questions —— 查詢模式
- Configuration —— 環境變數與調校
- Supported inputs —— 語言與檔案類型
- Team workflows 與 PR review
- Troubleshooting 與 How it works
實際演示

圖譜建立完成後,你可以查詢它而不必再逐一讀檔案。以下是在上述 FastAPI 程式碼庫上執行 graphify 的真實輸出:
$ graphify explain "APIRouter"
Node: APIRouter
  Source:    routing.py L2210
  Community: 2
  Degree:    47

Connections (47):
  --> RequestValidationError [uses] [INFERRED]
  --> Dependant [uses] [INFERRED]
  --> .get() [method] [EXTRACTED]
  <-- __init__.py [imports] [EXTRACTED]
  ...

$ graphify path "FastAPI" "ModelField"
Shortest path (3 hops):
  FastAPI --uses--> DefaultPlaceholder <--references-- get_request_handler() --references--> ModelField
每一條邊都帶有一個信心標籤(EXTRACTED = 原始碼中明確存在,INFERRED = 由解析推導得出),因此你能分清哪些是直接讀取的、哪些是推斷出來的。graphify query "<question>" 會針對一個自然語言問題回傳一個限定範圍的子圖,graphify path A B 則會追蹤任意兩個事物之間如何連接。
它能做什麼
開箱即用你能獲得的內容:
| 能力 | 你能獲得什麼 |
|---|---|
| 上帝節點(God nodes) | 連接最多的概念,讓你看清一切都匯聚於何處 |
| 社群(Communities) | 將圖譜拆分為子系統(Leiden),並帶有無需 LLM 的標籤 |
| 跨檔案連結 | 透過 tree-sitter AST,在約 40 種語言中解析 calls / imports / inherits / mixes_in |
| 查詢、路徑、解釋 | 提出問題、追蹤兩個事物之間的路徑,或解釋某一個概念,全部針對 graph.json 進行 |
| 理由 + 文件引用 | # NOTE: / # WHY: 註解以及 ADR/RFC 引用會成為與程式碼相連的一等節點 |
| 超越程式碼 | 文件、PDF、圖片、影片/音訊都會映射到同一張圖中 |
| 在地優先 | 程式碼在本機用 tree-sitter 解析(無需 LLM,任何內容都不離開你的機器);只有對文件/媒體的語意解析才會呼叫後端,而且僅在你設定後才會呼叫 |
Tip
要在多個儲存庫或 monorepo 中執行它?Graphify Cloud 會持續地完成這件事,並將代理的 token 開銷削減 80%,帶有跨儲存庫連結、SDLC 全局程式碼審查、形式化驗證,以及 Sentry/Jira 連接器。開始 14 天免費試用 →
基準測試
| 基準測試 | 指標 | graphify | 同類系統 |
|---|---|---|---|
| LOCOMO (n=300) | recall@10 | 0.497 | mem0 0.048, supermemory 0.149 |
| LOCOMO (n=300) | QA accuracy | 45.3% | supermemory 49.7%, mem0 27.3% |
| LongMemEval-S (n=50) | QA accuracy | 76% | tied with dense RAG |
| ERPNext cross-tool (n=6) | key-fact coverage | 82.0% | grep/read baseline 70.8% |
| Graph build | LLM credits | 0 | per-token for most systems |
每個系統都在相同的測試框架上執行,使用相同的模型和預算,並由一位評審評分,該評審與第二位評審進行了盲驗證(一致率 90.6%,Cohen's kappa 0.81)。完整的逐系統表格、程式碼智慧結果以及重現命令:BENCHMARKS.md。
先決條件
| 要求 | 最低版本 | 檢查 | 安裝 |
|---|---|---|---|
| Python | 3.10+ | python --version |
python.org |
| uv (建議) | 任意 | uv --version |
curl -LsSf https://astral.sh/uv/install.sh | sh |
| pipx (替代) | 任意 | pipx --version |
pip install pipx |
macOS 快速安裝(Homebrew):
brew install python@3.12 uv
Windows 快速安裝:
winget install astral-sh.uv
Ubuntu/Debian:
sudo apt install python3.12 python3-pip pipx
# or install uv:
curl -LsSf https://astral.sh/uv/install.sh | sh
Install
Important
官方套件: PyPI 上的套件名為
graphifyy(雙 y)。PyPI 上其他graphify*套件與本專案無任何關聯。CLI 命令仍為graphify。
官方原始碼儲存庫是 Graphify-Labs/graphify。
步驟 1 —— 安裝套件:
# Recommended (isolated env; if 'graphify' isn't found after, run: uv tool update-shell):
uv tool install graphifyy

# Alternatives:
pipx install graphifyy
pip install graphifyy  # may need PATH setup — see note below
步驟 2 —— 向你的 AI 助理註冊該技能:
graphify install
就這樣。開啟你的 AI 助理並輸入 /graphify .
若要將助理技能安裝到目前的儲存庫,而非你的使用者
設定檔,請加上 --project:
graphify install --project
graphify install --project --platform codex
專案範圍的安裝會寫入目前目錄之下,例如
.claude/skills/graphify/SKILL.md 或 .agents/skills/graphify/SKILL.md(外加一個
技能按需載入的 references/ 附帶目錄),並會
為可提交的檔案印出一條 git add 提示。
支援專案範圍安裝的各平台命令都接受相同的旗標,
例如 graphify claude install --project 或 graphify codex install --project。
Tip
遇到
command not found、Mac/Windows 上的pip問題、PowerShell 引號問題、uvx用法、git hook 的 PATH 怪癖,或是嚴格模式問題?請參閱 Installation 和 Troubleshooting。
選擇你的平台(20+ 助理,點擊展開)
| 平台 | 安裝命令 |
|---|---|
| Claude Code (Linux/Mac) | graphify install |
| Claude Code (Windows) | graphify install (auto-detected) or graphify install --platform windows |
| CodeBuddy | graphify install --platform codebuddy |
| Codex | graphify install --platform codex |
| OpenCode | graphify install --platform opencode |
| Kilo Code | graphify install --platform kilo |
| GitHub Copilot CLI | graphify install --platform copilot |
| VS Code Copilot Chat | graphify vscode install |
| Aider | graphify install --platform aider |
| OpenClaw | graphify install --platform claw |
| Factory Droid | graphify install --platform droid |
| Trae | graphify install --platform trae |
| Trae CN | graphify install --platform trae-cn |
| Gemini CLI | graphify install --platform gemini |
| Hermes | graphify install --platform hermes |
| Kimi Code | graphify install --platform kimi |
| Amp | graphify amp install |
| Agent Skills (cross-framework) | graphify install --platform agents (alias --platform skills) |
| Kiro IDE/CLI | graphify kiro install |
| Pi coding agent | graphify install --platform pi |
| Cursor | graphify cursor install |
| Devin CLI | graphify devin install |
| Google Antigravity | graphify antigravity install |
Codex 使用者還需要在 ~/.codex/config.toml 的 [features] 下設定 multi_agent = true,以便進行並行擷取。CodeBuddy 使用與 Claude Code 相同的 Agent 工具和 PreToolUse hook 機制。Factory Droid 使用 Task 工具進行並行子代理派發。OpenClaw 和 Aider 使用循序擷取(這些平台上的並行代理支援仍處於早期階段)。Trae 使用 Agent 工具進行並行子代理派發,且不支援 PreToolUse hook,因此 AGENTS.md 是其始終在線的機制。
--platform agents(別名 --platform skills)面向通用的跨框架 Agent-Skills 位置:對於全域安裝,使用規範定義的使用者全域目錄 ~/.agents/skills/(由 npx skills 及符合規範的框架讀取);對於專案(--project)安裝,使用 ./.agents/skills/。裸的 graphify install 依設計仍為單一平台(Claude Code)—— 當你希望該技能能被任何讀取 .agents/skills 的框架發現時,請使用名為 agents 的平台。
Codex 使用
$graphify而非/graphify。
可選附加元件(只安裝你需要的)
| 附加元件 | 它添加了什麼 | 安裝 |
|---|---|---|
pdf |
PDF 擷取 | uv tool install "graphifyy[pdf]" |
office |
.docx 和 .xlsx 支援 |
uv tool install "graphifyy[office]" |
google |
Google Sheets 轉譯 | uv tool install "graphifyy[google]" |
video |
影片/音訊轉錄(faster-whisper + yt-dlp) | uv tool install "graphifyy[video]" |
mcp |
MCP stdio 伺服器 | uv tool install "graphifyy[mcp]" |
neo4j |
Neo4j 推送支援 | uv tool install "graphifyy[neo4j]" |
falkordb |
FalkorDB 推送支援 | uv tool install "graphifyy[falkordb]" |
svg |
SVG 圖譜匯出 | uv tool install "graphifyy[svg]" |
leiden |
Leiden 社群偵測(Python < 3.13 用 graspologic;3.13+ 用原生後端) | uv tool install "graphifyy[leiden]" |
ollama |
Ollama 本機推論 | uv tool install "graphifyy[ollama]" |
openai |
OpenAI / 相容 OpenAI 的 API | uv tool install "graphifyy[openai]" |
gemini |
Google Gemini API | uv tool install "graphifyy[gemini]" |
anthropic |
Anthropic Claude API(--backend claude,使用 ANTHROPIC_API_KEY) |
uv tool install "graphifyy[anthropic]" |
bedrock |
AWS Bedrock(使用 IAM,無需 API 金鑰) | uv tool install "graphifyy[bedrock]" |
azure |
Azure OpenAI Service(--backend azure,使用 AZURE_OPENAI_API_KEY + AZURE_OPENAI_ENDPOINT) |
uv tool install "graphifyy[openai]" |
sql |
SQL 結構描述擷取 | uv tool install "graphifyy[sql]" |
postgres |
即時 PostgreSQL 內省(--postgres DSN) |
uv tool install "graphifyy[postgres]" |
dm |
BYOND DreamMaker .dm/.dme AST 擷取(若無與你平台相符的 wheel,可能需要 C 編譯器 + python3-dev) |
uv tool install "graphifyy[dm]" |
terraform |
Terraform / HCL .tf/.tfvars/.hcl AST 擷取 |
uv tool install "graphifyy[terraform]" |
pascal |
Pascal / Delphi .pas/.dpr/.dpk/.inc AST 擷取(更精確的 calls/inherits 邊;缺少時回退到正規表達式擷取器) |
uv tool install "graphifyy[pascal]" |
ocaml |
OCaml .ml/.mli AST 擷取 |
uv tool install "graphifyy[ocaml]" |
commonlisp |
Common Lisp .lisp/.cl/.lsp/.asd AST 擷取 |
uv tool install "graphifyy[commonlisp]" |
robot |
Robot Framework .robot/.resource 擷取(測試套件、測試案例、關鍵字、關鍵字呼叫以及 resource/library 匯入邊) |
uv tool install "graphifyy[robot]" |
chinese |
中文查詢斷詞(jieba) | uv tool install "graphifyy[chinese]" |
all |
以上全部 | uv tool install "graphifyy[all]" |
讓你的助理始終使用圖譜
建立圖譜後,在你的專案中執行一次:
在你的專案中執行一次 graphify <platform> install,例如 graphify claude install 或 graphify codex install(或 graphify install --platform <name>)。
這會寫入一個小型設定檔,告訴你的助理在回答程式碼庫問題時去查閱知識圖譜,並優先使用像 graphify query "<question>" 這樣的限定範圍查詢,而非讀取完整報告或對原始檔案進行 grep。
- Hook 平台(Claude Code、Gemini CLI):在搜尋類工具呼叫之前(以及在 Claude Code 上,透過 Read/Glob 工具逐一讀取原始碼檔案之前)會自動觸發一個 hook,推動你的助理走圖譜這條路徑。
- 指令檔平台(Codex、OpenCode、Cursor 等):持久化的指令檔(
AGENTS.md、.cursor/rules/等)提供同樣的「查詢優先」指引。
GRAPH_REPORT.md 仍可用於寬泛的架構審查。
CodeBuddy 做與 Claude Code 相同的兩件事:寫入一個 CODEBUDDY.md 段落,告訴 CodeBuddy 在回答架構問題前先讀取 graphify-out/GRAPH_REPORT.md;並安裝 PreToolUse hook(.codebuddy/settings.json),它會在 Bash 搜尋命令和檔案讀取之前觸發,推動改用 graphify query。
Codex 會寫入 AGENTS.md,這正是該平台上真正承載始終在線圖譜指引的地方。graphify codex install 也會在 .codex/hooks.json 中註冊一個 PreToolUse hook(graphify hook-check),但該項目被刻意設為空操作:Codex Desktop 會拒絕 PreToolUse 上的 hookSpecificOutput.additionalContext,因此在那裡發出提示會破壞 Bash 工具呼叫。與 Claude Code 不同——在 Claude Code 上由 hook(graphify hook-guard)負責提示——在 Codex 上,hook 會觸發並刻意什麼都不做,而 AGENTS.md 才是始終在線的機制。
Kilo Code 會將 Graphify 技能安裝到 ~/.config/kilo/skills/graphify/SKILL.md,並將一個原生的 /graphify 命令安裝到 ~/.config/kilo/command/graphify.md。graphify kilo install 還會寫入 AGENTS.md,外加一個原生的 tool.execute.before 外掛(.kilo/plugins/graphify.js + .kilo/kilo.json 或 .kilo/kilo.jsonc 註冊),使 Kilo 能透過原生 .kilo 設定獲得同樣的始終在線圖譜提醒行為。
Cursor 會寫入 .cursor/rules/graphify.mdc 並設定 alwaysApply: true,因此 Cursor 會在每次對話中自動包含它,無需 hook。
要一次從所有平台移除 graphify:graphify uninstall(加上 --purge 還會刪除 graphify-out/)。或使用各平台對應的命令(例如 graphify claude uninstall)。
報告中有什麼
GRAPH_REPORT.md 彙整了上帝節點、社群和關鍵路徑,用於寬泛的架構審查。圖譜是如何建立的、包含什麼內容:How graphify works。
它能處理哪些檔案
graphify 用 tree-sitter AST 在本機解析約 40 種程式語言,並透過一次可選的語意解析映射文件、PDF、圖片以及音訊/影片。完整清單:Supported inputs。
常用命令
/graphify .                        # build graph for current folder
/graphify ./docs --update          # re-extract only changed files
/graphify . --cluster-only         # rerun clustering without re-extracting
/graphify . --cluster-only --resolution 1.5      # more granular communities
/graphify . --cluster-only --exclude-hubs 99     # suppress utility super-hubs from god-node rankings
/graphify . --no-viz               # skip the HTML, just the report + JSON
/graphify . --wiki                 # build a markdown wiki from the graph
graphify export callflow-html      # Mermaid architecture/call-flow HTML (auto-regenerates on every git commit if hook is installed)

/graphify query "what connects auth to the database?"
/graphify path "UserService" "DatabasePool"
/graphify explain "RateLimiter"

/graphify add https://arxiv.org/abs/1706.03762   # fetch a paper and add it
/graphify add <youtube-url>                       # transcribe and add a video

graphify hook install              # auto-rebuild on commit + branch checkout (run `graphify update .` after `git pull` — see "Recommended workflow" below)
graphify merge-graphs a.json b.json              # combine two graphs

graphify prs                       # PR dashboard: CI state, review status, worktree mapping
graphify prs 42                    # deep dive on PR #42 with graph impact
graphify prs --triage              # AI ranks your review queue (uses whatever backend is configured)
graphify prs --conflicts           # PRs sharing graph communities — merge-order risk
參見下方的完整命令參考。
忽略檔案
graphify 遵循 .gitignore,並支援 --exclude 模式和專案層級的 .graphifyignore。詳情:Configuration。
團隊設定
提交或分享圖譜,讓你的整個團隊查詢相同的脈絡,並藉助圖譜脈絡審查拉取請求。參見 Share context with your team 和 Review pull requests。
直接使用圖譜
除了透過你的 AI 助理,你還可以直接從 CLI 用 graphify query、graphify path 和 graphify explain 查詢 graph.json。參見 Ask better graph questions 和 query reference。
環境變數
後端、API 金鑰、hook 行為和調校均由環境變數控制。完整表格:Configuration。
隱私
- 程式碼檔案 —— 透過 tree-sitter 在本機處理。任何內容都不會離開你的機器。純程式碼語料無需 API 金鑰 ——
graphify extract完全離線執行。在混合儲存庫中,加上--code-only可僅索引程式碼,並略過那些原本需要 LLM 的文件/PDF/圖片。 - 影片 / 音訊 —— 使用 faster-whisper 在本機轉錄。任何內容都不會離開你的機器。
- 文件、PDF、圖片 —— 傳送到你的 AI 助理進行語意擷取(透過
/graphify技能,使用你 IDE 工作階段所執行的任何模型)。無頭的graphify extract需要GEMINI_API_KEY/GOOGLE_API_KEY(Gemini)、MOONSHOT_API_KEY(Kimi)、ANTHROPIC_API_KEY(Claude)、OPENAI_API_KEY(OpenAI)、DEEPSEEK_API_KEY(DeepSeek)、一個正在執行的 Ollama 實例(OLLAMA_BASE_URL)、透過標準提供者鏈提供的 AWS 憑證(Bedrock —— 無需 API 金鑰,使用 IAM),或者claudeCLI 二進位檔(Claude Code —— 無需 API 金鑰,使用你的 Claude 訂閱)。--dedup-llm旗標使用相同的金鑰。 - 資料落地(Data residency) ——
graphify extract會根據已設定的 API 金鑰自動偵測使用哪個提供者(優先順序:Gemini → Kimi → Claude → OpenAI → DeepSeek → Azure → Bedrock → Ollama)。對於有資料落地要求的程式碼,請使用--backend ollama(完全在地)或傳入明確的--backend旗標。Kimi(MOONSHOT_API_KEY)會路由到位於中國的 Moonshot AI 伺服器。 - 無遙測、無使用情況追蹤、無分析。
- 查詢記錄 —— 每一次
graphify query、graphify path、graphify explain以及 MCPquery_graph呼叫都會以 JSON Lines 格式記錄到~/.cache/graphify-queries.log(時間戳、問題、語料、回傳的節點數、耗時)。預設不儲存完整的子圖回應。設定GRAPHIFY_QUERY_LOG_DISABLE=1可退出,或設定GRAPHIFY_QUERY_LOG=/dev/null在不停用程式碼路徑的情況下靜音它。
疑難排解
常見的安裝與擷取問題及其修復方法:Troubleshooting。
完整命令參考
每一個命令和旗標,附帶範例:CLI reference。
了解更多
- docs.graphify.com —— 完整文件:指南、命令參考和整合
- How it works —— 擷取流水線、社群偵測、信心評分、基準測試
- ARCHITECTURE.md —— 模組拆解、如何新增一門語言
- Optional integrations —— Docker MCP Toolkit + SQLite
- The Memory Layer —— 講述 graphify 背後理念的書,從頭到尾剖析其架構
Graphify Cloud
Graphify Cloud 是建構在 graphify 之上的始終在線層。它不是一張你按資料夾按需重建的圖,而是在你的整個軟體開發生命週期中保持一張即時圖:
- token 減少 80% —— 始終在線的記憶意味著你的代理不必在每次工作階段重新讀取和重新解釋程式碼庫。
- Monorepo 與跨儲存庫 —— 一張橫跨每個服務和儲存庫的連通圖,而非每個資料夾一張圖。
- 形式化驗證 —— 對照即時圖檢查架構與相依性的不變條件。
- 帶有 SDLC 全局視角的程式碼審查 —— 在合併之前就看清一處改動如何波及整個系統。
- SDLC 連接器 —— 接入 Sentry、Jira 等,讓事故、工單和程式碼同處一張圖中。
- 始終在線 —— 在背景橫跨程式碼、文件和會議持續更新。
在 app.graphify.com 開始 14 天免費試用 →
參與貢獻
歡迎貢獻。有關開發環境設定、測試與 CI 對齊命令、git 工作流,以及什麼樣的貢獻最有價值(有示範的範例和擷取缺陷報告最為有用),請參閱 CONTRIBUTING.md。架構以及如何新增一門語言:ARCHITECTURE.md。
新來的?來 Discord 或 GitHub Discussions 打個招呼吧。
貢獻者
由 contrib.rocks 製作。
翻譯
本 README 提供 32 種語言版本。使用本檔案頂部的語言切換器閱讀你所需的語言,或瀏覽 docs/translations/。若要改進某個翻譯或新增一個翻譯,請針對那裡對應的檔案提交一個拉取請求。
基於 graphify 建構
正在 graphify 生態中建構某些東西?我們鼓勵這樣做。如果你的專案名稱中使用了 "graphify"(例如 graphify-dashboard 或 graphify-action),請在你的 README 中加入一條簡短說明,澄清它是社群建構的,與 Graphify Labs 無從屬關係,也未獲其背書。"graphify" 和 graphify 標誌是 Graphify Labs 的標識;請不要以暗示官方身分的方式使用它們。
社群與連結



